Phaser 3: Build a Coin Plinko Game from Scratch with Matter Physics
Shohanur Rahaman
phaser, javascript, typescript
2024-05-14T04:14:54-08:00
### Overview
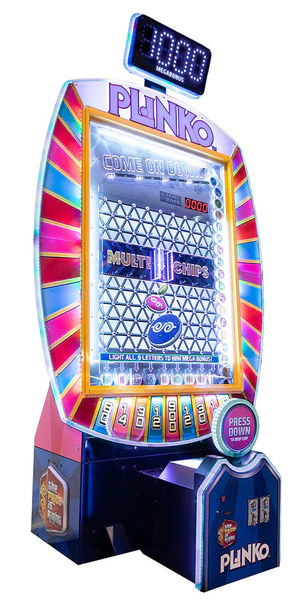
We’ll create a digital version of the popular arcade game, **Coin Plinko**. Players aim to win prizes by dropping coins down a pegged board into differently valued slots. Combining luck and strategy, they decide where to drop the coins for the best chance of winning big.
### Assets Preparation
To develop the game, we need several visual elements, which I’ve already prepared:
– A coin sprite (that will drop from the top)
– A pin (for which we’ll use a Phaser graphics element)
– An image of the lower bucket (where the coin will drop and rewards will be added)
– A background sprite (not necessary, but nice to have)
– Several UI elements
**Download the assets from [here](https://learnphaserjs.com/downloads/plinko-assets.zip)**.
### Setting up Environment
The first step is to clone this GitHub repository: [phaser3-webpack-ts-template](https://github.com/dino-foot/phaser3-webpack-ts-template)
This is a Phaser3 TypeScript template to kickstart our game development. Credit for the original template goes to [phaser.io](http://phaser.io/). I’ve incorporated some of my helper classes and codes to speed up our development process. I’ll provide explanations for those additions as we proceed.
In the scenes folder, there are five scene scripts already created. We will use them as needed.

After you’ve cloned the repository, you’ll need to install the dependencies. In the _package.json_ file, you’ll find the packages required for our development.
**Ensure Node.js is installed on your PC with a version of 18.12.0 or higher.**
To install the packages, use the command **yarn install**.
After installing the packages, you can test the project using the command **yarn dev**. This will start a local server and open the game in your default browser.
This should open a gradient background in your browser. If you see this, **you’re ready to start developing the Coin Plinko game**.
### Initiate Project
Open the project in your favorite code editor. We’ll start by editing the game resolution in the `main.ts` file. which is the entry script for your game. Here, you should add all your game scenes such as Boot, Preload, Menu, Game etc. You also need to define parameters like game width, height, scaling modes, physics, plugins, and so on.
Find out more information about the Game Config at : [Phaser 3 Game Config](https://photonstorm.github.io/phaser3-docs/Phaser.Types.Core.html#.GameConfig)
Now update the exsiting game config. update the **width, height and** add **physics config there.** Our game orientation will be portrait and and we will be use **Matter** physics.
typescript
 width: 1080,
 height: 1920,
...
physics: {
        default: 'matter',
        matter: {
            gravity: {
                y: 1,
                x: 0
            },
            debug: false
        }
    },
    ...
Now, set the **debug: matterDebugConfig**. Once we finish the game, we will set **debug:false** again. It is best practice to enable debug during the development phase. We also used a **matterDebug** config object in order to have better visibility during development.
const matterDebugConfig = {
  showAxes: true,
  showAngleIndicator: true,
  angleColor: 0xe81153,

  showCollisions: true,
  collisionColor: 0xf5950c,

  showBody: true,
  showStaticBody: true,
  showInternalEdges: true,

  renderFill: false,
  renderLine: true,

  fillColor: 0x106909,
  fillOpacity: 1,
  lineColor: 0x28de19,
  lineOpacity: 1,
  lineThickness: 5,

  staticFillColor: 0x0d177b,
  staticLineColor: 0x1327e4,

  showSleeping: true,
  staticBodySleepOpacity: 1,
  sleepFillColor: 0x464646,
  sleepLineColor: 0x999a99,
};
### Load Assets
Open **Preloader.ts** script. We will load the assets in the `preload` function. We will load the assets in the following order:
this.load.image("background-1", "plinko/bg-star.jpg");
this.load.image("background-2", "plinko/bg-town.jpg");
this.load.image("lower-part-1", "plinko/lower-part-1.png");
this.load.image("lower-part-2", "plinko/lower-part-2.png");
this.load.image("coin", "plinko/coin.png");
this.load.image("coin-bg", "plinko/coin-bg.png");
this.load.image("arrow-down", "plinko/arrow-down.png");
Now run your game by entering **yarn dev** into your terminal. You should see your game in portrait mode, centered vertically and horizontally with our background image. Don’t worry, we’ll replace this image in the next lesson.
this.load.on(
  "complete",
  () => {
    this.scene.start("Game");
  },
  this
);
### Create Background
Now open up **Game.ts** script, this script is extended from Phaser.Scene class, I already added few variables in the template. Let’s define a couple more variables in the Game class right after the background property.
...
worldZone: GameObjects.Zone;
...
We will use this zone object to align our background properly. init the **worldZone** inside **create** function
create() {
        this.camera = this.cameras.main;
        this.worldZone = this.add.zone(this.camera.centerX, this.camera.centerY, this.gamewidth, this.gameHeight);
        this.createBackground();
    }
Now update the **createBackground** function with this following codes
this.background = this.add
  .image(this.camera.centerX, this.camera.centerY, `background-${Phaser.Math.Between(1, 2)}`)
  .setOrigin(0.5)
  .setDepth(0);
this.background.setDisplaySize(this.camera.width, this.camera.height);
Display.Align.In.Center(this.background, this.worldZone);
we used Phaser Display class to align our background in the center and fill the whole screen area. Now you should see our latest background.

### Create Pins
Next we will create Pins, which will serve as obstacles within the gameplay. As new coins descend from the top, they will interact with these Pins. We will be using matter physics gameobject for pins.
private createPins() {
        const startY = 280;
        const startX = 10;
        const rows = 13;
        const columns = 11;
        const horizontalSpacing = 90;
        const verticalSpacing = 95;
        const offsetX = 50;
        const offsetY = 50;
        const rowOffsetX = 50; // Offset for zigzag pattern

        // Loop through rows and columns to create obstacles
        for (let row = 0; row < rows; row++) {
            for (let col = 0; col < columns; col++) {
                // Calculate position based on row and column
                let x;
                if (row % 2 === 0) {
                    x = offsetX + col * horizontalSpacing;
                } else {
                    x = offsetX + col * horizontalSpacing + rowOffsetX;
                }
                const y = offsetY + row * verticalSpacing;

                // Create obstacle and add to scene
                const pin = this.add.circle(x + startX, y + startY, 15, 0xff6699).setOrigin(0.5);
                pin.setDepth(1);
                pin.setStrokeStyle(3, 0xefc53f);

                const matterPin = this.matter.add.gameObject(pin, {
                    isStatic: true,
                    label: "pin",
                    shape: "circle",
                    circleRadius: 15,
                    frictionStatic: 0,
                });
            }
        }
    }
### Create Physics Category
Next, we will enable collisions between the coins and pins we just created. To do that, we will create Matter physics category. We’ll define three physics categories: one for pins, one for coins, and one for the reward buckets.
Now open up **Game.ts** and add the following variables.
...
pinsCategory: number;
coinsCategory: number;
bucketCategory: number;
initialize them with matter physics category in create method
create(){
	...
	this.pinsCategory = this.matter.world.nextCategory();
	this.coinsCategory = this.matter.world.nextCategory();
	this.bucketCategory = this.matter.world.nextCategory();
	...
}
The **matter.world.nextCategory()** returns a unique category bitfield there are total 32 unique bitfield you can use for your collision filtering.
### Drop Coins
Now we’ll focus on the functionality for dropping coins. When the player clicks or taps, a coin will drop or spawn from the designated area and collide with the pins. If the mouse cursor is inside the dropping area, a coin will be visible to indicate that the user can drop a coin from there. If the cursor is outside of that area, the coin will be invisible.
Create a method **handleInput** to handle the input event.
private handleInput() {
        const coinIndicator = this.add.image(0, 0, "coin").setScale(0.5).setDepth(2);
        coinIndicator.setVisible(false);

				// coin dropping area
        const rect = PhaserHelpers.addRectangle({ x: 0, y: 0, width: this.camera.width - 50, height: 100, depth: 2, color: 0xffffff }, this, true);
        rect.setInteractive();
        rect.setAlpha(0.1);
        // align with top center
        Display.Align.In.TopCenter(rect, this.worldZone, 0, -150);
    }
Now hook up the pointerdown, pointermove, and pointerout events.
– **pointermove**: to visible coin when pointer is inside that rect.
– **pointerdown**: drop a coin from that position.
– **pointerout**: disable coin drop indicator.
private handleInput() {
		...
		rect.on("pointerdown", (pointer) => {
            // hookup coin drop function here
        });

        rect.on("pointermove", (pointer, localX, localY, event) => {
            // console.log('pointerover');
            const posX = Phaser.Math.Snap.To(pointer.x, 25);
            const posY = rect.y + 20;

            coinIndicator.setVisible(true);
            coinIndicator.setPosition(posX, posY);
        });

        rect.on("pointerout", (pointer) => {
            coinIndicator.setVisible(false);
        });
}
Next, let’s create another method called ‘**dropNewCoin**.’ This method will take the pointer position and spawn a Matter game object. We’ll set the radius of the coin body to 45 so it’s small enough to pass through the gaps between the pins. Additionally, we’ll set the bounce value to 1 to ensure there’s no energy loss upon collision. The collision category will be set as ‘coinsCategory,’ which we created in an earlier section, and we’ll enable collision triggers with other coins, pins, and reward buckets.
private dropNewCoin(pos: vector2) {
        const coin = this.matter.add.image(pos.x, pos.y, "coin", null, {
            label: "coin",
            shape: "circle",
            circleRadius: 45,
        }).setScale(0.5).setDepth(2);

        coin.setFriction(0.005);
        coin.setBounce(1);
        coin.setCollisionCategory(this.coinsCategory);
        coin.setCollidesWith([this.coinsCategory, this.pinsCategory, this.bucketCategory]);
}
call this method from **pointerdown** event
rect.on("pointerdown", (pointer) => {
    this.dropNewCoin({ x: pointer.x, y: rect.y + 20 });
 );
Last things we need to do is add collision category to the pins. We will add the following code inside the **createPins** method.
private createPins() {
		...
		matterPin.body.gameObject.setCollisionCategory(this.pinsCategory);
}
Great progress so far! Now, collision detection between coins and pins should be up and running! If you encounter any issues or spot any potential oversights, let’s take a moment to regroup and address them. It’s important to ensure everything is working smoothly before moving forward.
### Recycle Dropped Coins
We will now recycle the coins that are off-screen. This is a common pattern in game development, where objects that are no longer visible or needed are destroyed and removed from memory to keep the game running smoothly. It’s crucial to understand that without this step, the device memory could become full, a process also known as garbage collection.
To achieve this, declare a variable named **coins** as a Set of Matter.Image in the class just below the **bucketCategory**
...
coins: Set<Phaser.Physics.Matter.Image>;
In the create function initilize the coins set
...
this.coins = new Set();
...
and create an **update** function and do the following,
update() {
			// Remove coins that are out of bounds
        this.coins.forEach((coin) => {
            if (coin.y > this.camera.height + 200) {
                coin.destroy();
                this.coins.delete(coin);
            }
        });
    }
In Summery, the forEach loop iterates over each coin in the **this.coins** collection. For each coin, it checks if the y position of the coin is greater than the height of the camera view plus an **offset** of 200. If it is, the coin is considered to be out of the view and is destroyed and removed from the **coins** collection.
### Create & Add Physics Shape
Now it is time to create the reward buckets where the coins will drop. Lets do it.
To accomplish this, we need to carry out several initial steps. First, create a physics shape using the Physics Editor available at **[physicseditor](https://www.codeandweb.com/physicseditor)** (it offers a free 7-day trial).
Begin by downloading and installing the Physics Editor on your PC and open the application. Then, use this Physics Editor to open our lower-part image.
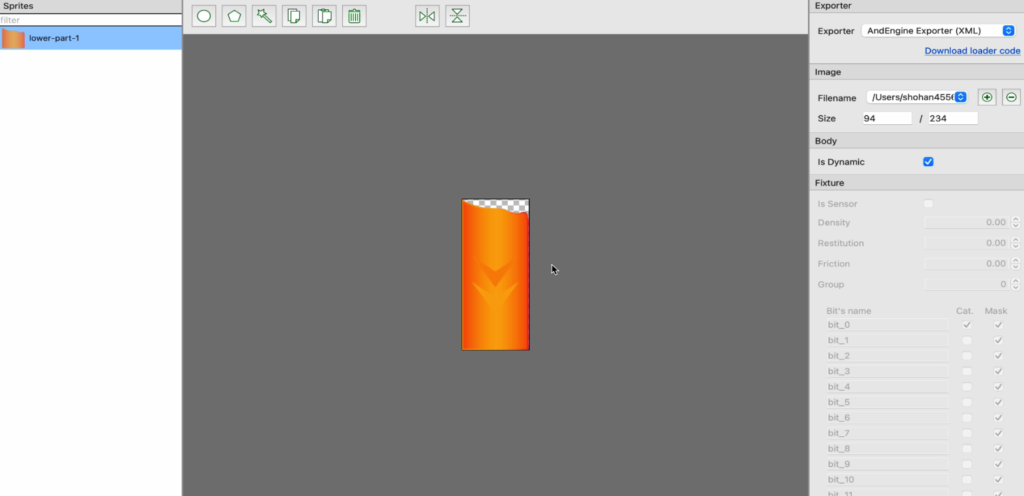
Now create a physics shape like bucket so our coins can fall into that bucket. Once you are done, give it a label and export it for Phaser as a JSON file.
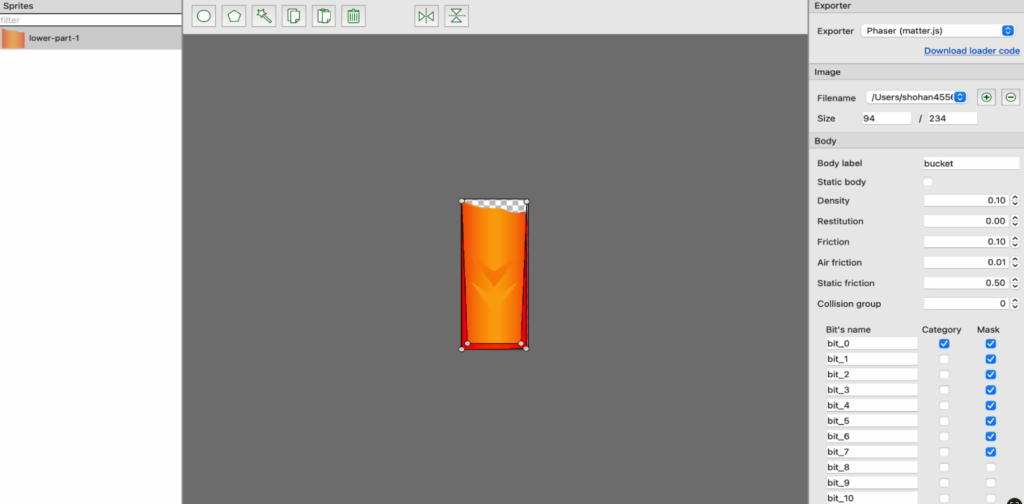

now Put the exported json file in your assets/plinko folder and load our exported json file in **Preloader.ts** script
...
this.load.json('physicsShape', 'plinko/bucket_shape.json');
### Adding Reward Buckets
In our **Game.ts** script define a class variable **physicsShape**
...
physicsShape: any;
In **Create** function, get the loaded shape from our cache which we will be using as reward bucket collider.
...
this.physicsShape = this.cache.json.get("physicsShape");
...
create a function **createRewardBuckets** and call it from **create** function in Game.ts. This function will create the reward buckets and add physics shape to them. We’ll use the label of the bucket to determine the reward value.
private createRewardBuckets() {
    for (let i = 0; i < 8; i++) {
      const rnd = Phaser.Math.Between(1, 5);
      const key = i % 2 === 0 ? "lower-part-1" : "lower-part-2";
      const bucket = this.matter.add.image(0, 0, key, null, {
        shape: this.physicsShape.bucketShape,
        label: `bucket_${rnd}`,
        isSensor: true,
        isStatic: true,
      });
      bucket.setOrigin(0.5).setScale(1.25);
      bucket.body.position.y -= 80;
      bucket.setCollisionCategory(this.bucketCategory);
      Display.Align.In.BottomLeft(bucket, this.worldZone, i * -120 - 80, -40);
      const prizeText = PhaserHelpers.addSimpleText(`x${rnd}`, bucket.x, bucket.y + 70, this);
      prizeText.setDepth(10);
    }
  }
create() {
```
this.createRewardBuckets();
}### Coin Vs Bucket Collision
The collision between the coin and the reward bucket is currently choppy. We’re going to fix this. Let’s create a function called **handleCoinVsBucketCollision**. This function will be triggered when a coin collides with a reward bucket.
private handleCoinVsBucketCollision() {
        this.matter.world.on("collisionstart", (event: Physics.Matter.Events.CollisionStartEvent) => {
            const bodyA = event.pairs[0]?.bodyA.gameObject; // bucket
            const bodyB = event.pairs[0]?.bodyB.gameObject; // coin

            if (bodyA.body.label.startsWith("bucket") && bodyB.body.label.startsWith("coin")) {
                bodyB.setBounce(0, 0);
                bodyB.setMass(10000);
                bodyB.setAngularSpeed(0);
                bodyB.setAngularVelocity(0);
                bodyB.setFrictionAir(0.01);
                bodyB.setVelocity(0);
                bodyB.setSensor(true);
                bodyB.body.collisionFilter.mask = 0;

            }
        });
    }
Now call this function from **create** function
create(){
	...
	this.handleCoinVsBucketCollision();
}
Now, you should see the coin and reward bucket colliding properly.
Once a coin collides with a reward bucket, we need a way to stop the collision from triggering multiple times, which would result in multiple scores. To fix this, we need a variable called **lastCoinId**. This variable will store the id of the last coin that collided with a reward bucket. If the current coin id matches the last coin id, we’ll skip the collision event.
Define it as a class variable.
...
lastCoinId:null;
Here is the updated function.
private handleCoinVsBucketCollision() {
        this.matter.world.on("collisionstart", (event: Physics.Matter.Events.CollisionStartEvent) => {
            const bodyA = event.pairs[0]?.bodyA.gameObject; // bucket
            const bodyB = event.pairs[0]?.bodyB.gameObject; // coin

						// prevent multiple collision
            if (this.lastCoinId === bodyB.body.id) return;

            if (bodyA.body.label.startsWith("bucket") && bodyB.body.label.startsWith("coin")) {
                bodyB.setBounce(0, 0);
                bodyB.setMass(10000);
                bodyB.setAngularSpeed(0);
                bodyB.setAngularVelocity(0);
                bodyB.setFrictionAir(0.01);
                bodyB.setVelocity(0);
                bodyB.setSensor(true);
                // assign last coin id
                this.lastCoinId = bodyB.body.id;
                bodyB.body.collisionFilter.mask = 0;
            }
        });
    }
### Score Calculation
Let’s modify the createBackground function to create a score HUD.
    private createBackground() {
        this.background = this.add.image(this.camera.centerX, this.camera.centerY, `background-${Phaser.Math.Between(1, 2)}`).setOrigin(0.5).setDepth(0);
        this.background.setDisplaySize(this.camera.width, this.camera.height);
        Display.Align.In.Center(this.background, this.worldZone);

        const coinBg = this.add.image(0, 0, "coin-bg").setDepth(1);
        Display.Align.In.TopRight(coinBg, this.worldZone, -10, -10);

        this.scoreText = PhaserHelpers.addSimpleText(`${this.score}$`, 0, 0, this);
        Display.Align.In.Center(this.scoreText, coinBg, 20);

        this.coinsCountText = PhaserHelpers.addSimpleText(`Coins Left : ${this.totalCoins}`, 200, 60, this);
}
Declare **scoreText**, **coinsCountText** and couple of variables to keep track of score and total coins.
scoreText: GameObjects.Text;
coinsCountText: GameObjects.Text;
score: number = 0;
totalCoins: number = 100;
create a function to update the HUD
updateHUD() {
        this.coinsCountText.setText(`Coins Left: ${this.totalCoins}`);
        this.scoreText.setText(`${this.score}$`);
    }
update the droped coins count in **dropNewCoin** function and update the HUD
private dropNewCoin(pos:vector2){
    ````
	  // update HUD
   this.totalCoins -= 1;
   this.updateHUD();
  }
update the score while colliding with reward buckets
private handleCoinVsBucketCollision(){
    if (bodyA.body.label.startsWith("bucket") && bodyB.body.label.startsWith("coin")) {
    ...
    this.lastCoinId = bodyB.body.id; // assign last coin id
    bodyB.body.collisionFilter.mask = 0;

                    this.score += parseInt(bodyA.body.label.match(/\d+/)[0]) * 10;
                    this.updateHUD();
                }
}
### Wrapup
Our game is now complete, although it currently lacks sound feedback. You’re welcome to add more sound and visual effects. Please share your updated version of the game with me!
**Play the finished game [here](https://learnphaserjs.com/games/plinko)**
**Download the complete source [here](https://github.com/shohan4556/phaser3-plinko)**